## Sửa Chữa Màn Hình DELL: IC TOP265VG Hỏng!
Câu chuyện sửa chữa màn hình máy tính DELL E1715SC – Hành trình tìm ra lỗi IC TOP265VG
Một màn hình DELL E1715SC tại bệnh viện nơi tôi làm việc đột ngột ngừng hoạt động. Tôi được yêu cầu khắc phục sự cố khẩn cấp. Sau khi tháo rời màn hình, kiểm tra trực quan không phát hiện bất kỳ tụ phồng, linh kiện cháy hay hư hỏng nào.
Bước đầu, tôi kiểm tra nguồn: điện áp 300V ở mạch nguồn chính vẫn ổn định, cho thấy bộ nguồn AC/DC không vấn đề. Tôi xả tụ, kiểm tra biến áp SMPS bằng máy đo vòng khuyên (Ring Tester) và xác nhận không có hiện tượng ngắn mạch ở cả cuộn sơ cấp và thứ cấp.
Tiếp theo, tôi tham khảo datasheet của IC chuyển mạch TOP265VG và kiểm tra điện áp khởi động – điện áp này vẫn có. Tôi kiểm tra kỹ lưỡng tất cả linh kiện ở cả mạch sơ cấp và thứ cấp, bao gồm cả ESR của các tụ điện – tất cả đều bình thường. Dù IC TOP265VG trông có vẻ bị nổ, nhưng thực tế thiết kế của nó vốn đã như vậy.
Để chắc chắn rằng SMPS hoạt động tốt, tôi tháo IC TOP265VG và kết nối một module 3 dây (xanh, đỏ, đen – dây xanh không sử dụng, đỏ nối với điểm B+ của cuộn dây biến áp SMPS, đen nối mát). (Ai muốn hiểu rõ hơn về module này có thể tham khảo bài viết của tôi tại: [https://jestineyong.com/cracked-unknown-pwm-replaced-by-universal-module-in-pressure-monitor-smps/](https://jestineyong.com/cracked-unknown-pwm-replaced-by-universal-module-in-pressure-monitor-smps/)) Tôi đặt điện trở ở mức tối thiểu và cấp nguồn. Các điện áp đầu ra xuất hiện bình thường.
Sau đó, tôi tháo module 3 dây và kết nối module 4 dây (5-24V) – (đã được giải thích chi tiết trong các bài viết trước của tôi: [https://jestineyong.com/a-five-wire-str-module-did-not-work-in-this-aoc-lcd-monitor-model-tft15w60ps/](https://jestineyong.com/a-five-wire-str-module-did-not-work-in-this-aoc-lcd-monitor-model-tft15w60ps/)). Như một biện pháp phòng ngừa, tôi thay thế IC quang 817 và IC điều khiển phản hồi TL431 sau khi đảm bảo các linh kiện xung quanh không có vấn đề. Module 4 dây cho phép kiểm tra mạch phản hồi và chức năng chuyển mạch chính xác hơn module 3 dây. Module 3 dây chịu được ngắn mạch ở mạch thứ cấp, trong khi module 4 dây có thể bị hỏng do sốc điện. Vì vậy, tôi đã sử dụng phương pháp này. Các điện áp mong muốn đã xuất hiện.
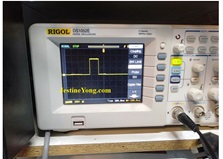
Tôi đặt mua IC TOP265VG thay thế và nhận được nó vào ngày hôm sau. Sau khi tháo module, tôi hàn IC vào vị trí. Khi bật nguồn màn hình sau khi kết nối bo mạch chủ và màn hình, màn hình hoạt động tốt. Tôi cấp tín hiệu từ máy tạo mẫu và cho chạy liên tục trong thời gian dài để kiểm tra độ bền. Màn hình hoạt động ổn định. Công việc sửa chữa đã hoàn tất!
Về tác giả:
Bài viết này được thực hiện bởi Parasuraman Subramanian từ Ấn Độ. Ông 74 tuổi, có hơn 30 năm kinh nghiệm sửa chữa thiết bị cổ điển như máy thu thanh đèn, amply, máy ghi âm cuộn băng và hiện đang theo học các lớp công nghệ mới do Hiệp hội Kỹ thuật viên Điện tử bang Kerala tổ chức. Ông tốt nghiệp BBA, có bằng kỹ thuật vô tuyến tư thục và đã nghỉ hưu với chức vụ Giám đốc điều hành của một công ty Mỹ. Hiện ông đang làm tư vấn cho bệnh viện và các tổ chức khác.
Hãy ủng hộ bài viết bằng cách chia sẻ! Phản hồi của bạn rất được chào đón.
Đừng quên đăng ký để không bỏ lỡ bài viết mới của tôi!
(Tham khảo bài viết trước của tác giả về việc sửa chữa đầu đĩa DVD Sharp DV-SL1000W)
#SuaChuaManHinh #DELL #TOP265VG #HongIC #SuaChuaDienTu #LapRapMayTinh #KyThuatSuaChua #ManHinhDELL #E1715SC #BaoDuongMayTinh
Hãy viết bài báo dài đầy đủ chuyên nghiệp hay bằng tiếng VIệt kèm hashtag TOP 265VG Found Failed In DELL Computer Monitor Model E1715SC

This belonged to the hospital where I work and was admitted to my home hospital for emergency service. The complaint was that the Monitor became dead suddenly. I removed the screws holding the stand and the back cover and pried open to investigate what went wrong.
As visual inspection did not find any bulgy caps or damaged or burnt parts, when I applied power. On checking the power supply board, the 300+ Volt was present which meant that there was no issue in the primary AC/DC supply. Then discharged the cap and checked the SMPS transformer using Ring Tester. I found it to be healthy indicating that there were no shorts either in the primary or secondary. I looked at the datasheet of the switching IC TOP 265VG and checked whether the IC was getting startup voltage and found it to be present. Checked all components in the primary for any short, leak or open. Did the same on the secondary also. Could not find any. ESR of capacitors was also found to be ok.
Following is an extract of the datasheet of this crude looking IC along with a picture of the IC. On a sudden look, we might think that the IC is burst. But its design itself was like that!
In order to confirm that the SMPS was indeed working, I removed the IC and connected a three wire Module (Green, Red and Black – Green is not used. Red should be connected to the B+ return point of the SMPS transformer winding and black to the ground.)
As I have explained the use of this module several times in my various articles, I am skipping it in this article. (Those who still want to know, may please read this article: I kept the potentiometer at the minimum and applied power.
The outputs were present. Then removed the module and connected a four wire module (5 to 24V module) the use of which was also explained by me in my previous articles. As a precaution, I replaced the opto IC 817 and feedback control IC TL431, after ensuring that the surrounding components were ok. (For those who might have missed:
) The advantage of this module is that we can check the feedback circuit and proper switching function unlike the three wire module. The 3 wire module can withstand any shorts in the secondary, whereas the four wire module (5-24V module as it is called) might succumb to such shocks. That’s why I used this method. Then the desired voltages were present.
So, I ordered for replacement of the IC. Got it the next day and removed the module and soldered the IC in its place.
Then when I powered the monitor on after connecting the mother board and panel, it was found working very well. I fed a signal from the pattern generator. After allowing the monitor to be in on conditions for sufficient time, I fixed the covers and once again left it on for a very long time as a part of ageing test. It was found working very well, pulling the curtain down on this repair job, before which the satisfaction jumped into the bag.
This article was prepared for you by Parasuraman Subramanian from India. He is 74 years old and has more than 30 years’ experience in handling antique equipment like Valve Radio, Amps, Reel Tape Recorders and currently studying latest tech-classes conducted by Kerala State Electronics Technicians’ Association. He has done graduation in BBA degree, private diploma in Radio Engineering and retired as MD of a USA company. Presently working as Consultant to Hospital and other institutions.
Please give a support by clicking on the social buttons below. Your feedback on the post is welcome. Please leave it in the comments.
P.S-If you enjoyed reading this, to subscribe to my blog (free subscription). That way, you’ll never miss a post. You can also forward this website link to your friends and colleagues-thanks!
You may check on his previous article on
Likes (1)Dislikes
 (0)
(0)
//
(tiêu đề viết lên đầu)
TOP 265VG Found Failed In DELL Computer Monitor Model E1715SC
This belonged to the hospital where I work and was admitted to my home hospital for emergency service. The complaint was that the Monitor became dead suddenly. I removed the screws holding the stand and the back cover and pried open to investigate what went wrong.
As visual inspection did not find any bulgy caps or damaged or burnt parts, when I applied power. On checking the power supply board, the 300+ Volt was present which meant that there was no issue in the primary AC/DC supply. Then discharged the cap and checked the SMPS transformer using Ring Tester. I found it to be healthy indicating that there were no shorts either in the primary or secondary. I looked at the datasheet of the switching IC TOP 265VG and checked whether the IC was getting startup voltage and found it to be present. Checked all components in the primary for any short, leak or open. Did the same on the secondary also. Could not find any. ESR of capacitors was also found to be ok.
Following is an extract of the datasheet of this crude looking IC along with a picture of the IC. On a sudden look, we might think that the IC is burst. But its design itself was like that!
In order to confirm that the SMPS was indeed working, I removed the IC and connected a three wire Module (Green, Red and Black – Green is not used. Red should be connected to the B+ return point of the SMPS transformer winding and black to the ground.)
As I have explained the use of this module several times in my various articles, I am skipping it in this article. (Those who still want to know, may please read this article: I kept the potentiometer at the minimum and applied power.
The outputs were present. Then removed the module and connected a four wire module (5 to 24V module) the use of which was also explained by me in my previous articles. As a precaution, I replaced the opto IC 817 and feedback control IC TL431, after ensuring that the surrounding components were ok. (For those who might have missed:
) The advantage of this module is that we can check the feedback circuit and proper switching function unlike the three wire module. The 3 wire module can withstand any shorts in the secondary, whereas the four wire module (5-24V module as it is called) might succumb to such shocks. That’s why I used this method. Then the desired voltages were present.
So, I ordered for replacement of the IC. Got it the next day and removed the module and soldered the IC in its place.
Then when I powered the monitor on after connecting the mother board and panel, it was found working very well. I fed a signal from the pattern generator. After allowing the monitor to be in on conditions for sufficient time, I fixed the covers and once again left it on for a very long time as a part of ageing test. It was found working very well, pulling the curtain down on this repair job, before which the satisfaction jumped into the bag.
This article was prepared for you by Parasuraman Subramanian from India. He is 74 years old and has more than 30 years’ experience in handling antique equipment like Valve Radio, Amps, Reel Tape Recorders and currently studying latest tech-classes conducted by Kerala State Electronics Technicians’ Association. He has done graduation in BBA degree, private diploma in Radio Engineering and retired as MD of a USA company. Presently working as Consultant to Hospital and other institutions.
Please give a support by clicking on the social buttons below. Your feedback on the post is welcome. Please leave it in the comments.
P.S-If you enjoyed reading this, to subscribe to my blog (free subscription). That way, you’ll never miss a post. You can also forward this website link to your friends and colleagues-thanks!
You may check on his previous article on
Likes(1)Dislikes(0)
//
[su_box title=”Liên hệ đặt mua sản phẩm tại bài viết tại Viễn Đông Mobile” style=”default” box_color=”#3be863″ title_color=”#FFFFFF” radius=”3″]
Viễn Đông Mobile là cửa hàng chuyên kinh doanh các sản phẩm điện tử phục vụ nhu cầu chơi game, bao gồm:
- Gaming phone: Điện thoại cấu hình mạnh, tối ưu cho việc chơi game.
- Máy tính bảng chuyên gaming: Màn hình lớn, hiệu năng cao, trải nghiệm game tốt hơn.
- Phụ kiện cao cấp: Tai nghe, bàn phím, chuột,… hỗ trợ game thủ.
Thông tin liên hệ:
- Địa chỉ: 211 đường 3/2, phường 11, quận 10, TP.HCM
- Điện thoại: 0777600020
- Email: contact@viendongmobile.com

Bản đồ chỉ đường
[su_gmap address=”211 đường 3/2 phường 11 quận 10 Tp hồ chí minh Việt Nam” responsive=”yes”] xin chào Xem chi tiết và đăng ký[featured_image]