## Sửa Chữa Amplifier: Chỉ Là Vấn Đề Nhỏ!
Một khách hàng mang đến cho tôi chiếc amply 5.1 của họ, theo lời giới thiệu của một người khác. Khách hàng phàn nàn rằng loa siêu trầm (Subwoofer) không hoạt động và một kênh của hệ thống loa vòm 5.1 cũng gặp sự cố.
Trước khi bắt tay vào sửa chữa, tôi đã hỏi kỹ về các loa đang được sử dụng và khuyên khách hàng kiểm tra từng loa một bằng một pin 1.5V. (Phương pháp: Chạm nhẹ dây loa vào cực pin và nghe xem có tiếng không. Đây là cách làm thô sơ, nhưng tôi dặn khách hàng chỉ chạm nhẹ, không giữ lâu!) Tất cả loa đều được gắn trên tường, nên việc kiểm tra này khá cần thiết.
Sau khi mở máy, tôi tiến hành làm sạch cẩn thận. Phải nói rằng, chất lượng lắp ráp của chiếc amply này rất ấn tượng, đạt chuẩn quốc tế. Ai là người lắp ráp nó đều xứng đáng được khen ngợi!
Chiếc amply được cấu tạo gồm các phần chính sau:
1. Bo nguồn (60V, 25V và 12V)
2. Mạch khuếch đại loa siêu trầm sử dụng transistor.
3. Mạch bảo vệ loa.
4. Năm mạch khuếch đại tín hiệu ra (có lẽ sử dụng chip TDA2030).
5. Mạch điều khiển đèn LED hiển thị mức âm lượng.
6. Mạch tiền khuếch đại và điều chỉnh âm sắc.
7. Bo nguồn 5V cho module USB/FM phía trước.
8. Module USB/FM.
Tôi kết nối sáu loa khác nhau và sử dụng máy tạo tín hiệu để kiểm tra xem tất cả các ngõ ra có hoạt động hay không. Tuy nhiên, phương pháp này không hiệu quả với tất cả các kênh vì các kênh này được thiết kế để phân tần số tạo hiệu ứng vòm. Vì vậy, tôi thử phát nhạc từ USB. Kết quả cho thấy, ngoại trừ ngõ ra của loa siêu trầm, tất cả đều hoạt động bình thường.
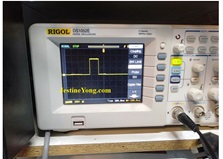
Tình cờ, tôi nhận thấy rằng loa siêu trầm chỉ bị cắt tín hiệu khi chỉnh âm lượng ở mức tối đa. Sau khi làm sạch và tra dầu mỡ cho tất cả các đầu nối và núm vặn, bụi bẩn không thể là nguyên nhân. Tôi phát hiện một bộ phận điều khiển âm lượng có hai cặp đầu nối, nhưng chỉ một cặp được sử dụng. Tôi đổi sang cặp còn lại và ngõ ra trở lại bình thường! Tôi kiểm tra tần số ở các ngõ ra bằng máy hiện sóng và ghi nhận được như sau:
*(Lưu ý: Dữ liệu tần số được lược bỏ do không có thông tin chi tiết trong bài gốc. Phần này cần bổ sung nếu có dữ liệu thực tế)*
Mặc dù tần số có thể thay đổi tùy thuộc vào loại nhạc, nhưng điều chắc chắn là các ngõ ra đều hoạt động tốt. Tôi không thể đo tín hiệu chuẩn vì các bộ lọc trong mạch làm cho tín hiệu bị cắt.
Vậy là, một vấn đề tưởng chừng lớn lao đã được giải quyết bằng cách đơn giản là đổi đầu nối và vệ sinh thiết bị. Tôi đã chạy thử amply trong vài giờ trước khi đóng máy và gọi khách hàng đến lấy.
Khách hàng sau đó cho biết họ đã phát hiện một sợi dây loa bị đứt và đã nối lại. Họ khẳng định đã kiểm tra tất cả các loa bằng cách kết nối chúng với các kênh khác nhau và bác bỏ mọi vấn đề về loa! Nhưng khách hàng đôi khi thật khó hiểu, và chúng ta cần phải đối phó với họ như họ là!
Nhiệm vụ hoàn thành xuất sắc!
*(Thêm ảnh các bảng mạch)*
Ghi chú: Tôi quên không đề cập rằng các bảng mạch amply và bảng nguồn được sản xuất bởi người bạn thân của tôi ở quê nhà. Tôi rất ngạc nhiên khi thấy chúng được một kỹ thuật viên giấu tên ở nơi xa sử dụng rất tốt. Tôi đã chia sẻ ảnh với người bạn của mình! (Tôi không tháo các bảng mạch ra khỏi amply để chụp ảnh mặt sau vì không muốn làm hỏng dây dẫn được sắp xếp gọn gàng).
Bài viết này được thực hiện bởi Parasuraman Subramanian đến từ Ấn Độ. Ông 74 tuổi, có hơn 30 năm kinh nghiệm xử lý thiết bị cổ điển như máy thu thanh đèn, amply, máy ghi âm băng cuộn và hiện đang theo học các lớp công nghệ mới nhất do Hiệp hội Kỹ thuật viên Điện tử Bang Kerala tổ chức. Ông tốt nghiệp BBA, có bằng kỹ thuật vô tuyến và đã nghỉ hưu với vị trí Giám đốc điều hành của một công ty tại Mỹ. Hiện ông đang làm tư vấn cho bệnh viện và các tổ chức khác.
Giá sửa chữa: (Không được đề cập trong bài gốc, cần bổ sung nếu có thông tin) Ví dụ: 300.000 VND
#SửaChữaAmply #Amply5.1 #LoaVòm #VấnĐềKỹThuật #ĐiệnTử #SửaChữaThiếtBị #KỹThuậtViện #HệThốngÂmThanh #LoaSiêuTrầm #HệThốngÂmThan
Hãy viết bài báo dài đầy đủ chuyên nghiệp hay bằng tiếng VIệt kèm hashtag This Lovely Locally Assembled Amplifier Had Only A Minor Problem

This amplifier was brought by a customer as per recommendation of another. The complaint was that the Sub-woofer was not working and one channel of the 5.1 Surround speaker systems was not working. I made preliminary enquiries about the speakers used and advised the customer to check each and every one of them using a single 1.5V cell, as all the speakers are fixed on the walls in his house. (Method: Touch the speaker wires to the cell and listen whether any sound is coming from the speaker. A crude method. But advised him not to keep it pressed but do only a touch and go!)
I opened the set and did a cleaning to the extent possible. Let us have a look at the lovely lay out and assembly which I am sure you all would agree that can match international standard. Whoever has assembled it and gave it to the customer has indefinitely done a praiseworthy creditable job indeed!
1) Power supply section (60V, 25V and 12V) 2) Subwoofer amplifier using transistors. 3) Speaker Protection circuit 4) Five output perhaps using TDA2030 series. 5) Audio level LED display driver 6) The preamp and tone control circuits 7) 5V supply for the USB/FM module fit in the front. 8) USB/FM Module.
I connected six speakers of various kinds. Then tried using my signal injector to check whether all the outputs were working. This did not work for all channels, as these were adjusted to split the frequencies to give a surround effect. So, played music from a USB and checked. Except for the subwoofer output, everything else was working. Then by chance I noticed that it was getting cut off only at full volume of the independent control it had. Since I had applied lubrication on all connectors and controls after the preliminary cleaning, dust or dirt could not be the problem. As there was a pair of connections in the dual pot, out of which only one set was used, I shifted the connections to the other side, upon which the output was normal. I checked the frequencies at the output using my oscilloscope and here are the findings of the six output stages:
While it is a fact that these might vary according to the music, one thing was confirmed that outputs indeed were coming out. I could not take such an output feeding a standard signal, as these get cut off due to filters employed in the circuit.
So, what looked like a major problem got resolved by a simple shifting of connections and perhaps because of the cleaning and lubrication. I played the Amp for several hours before closing the cover and calling the customer to pick it.
He later informed me that one of the wires of the speaker was found broken and he rejoined it. He had confirmed that he checked each and every speaker by connecting it to different channels and vehemently denied any problems in the speakers! But customers are strange and we need to deal with them as they are!
Mission accomplished with splendor and satisfaction got easy admission to the collection bag!
I am adding some more pictures of each board for those who might find it interesting:
P.S: Forgot to mention that Amplifier boards and power supply boards were manufactured by my close friend in my town and I was amused to see these used very well by an unknown technician situated far away from where the customer bought this. I shared the photos with my friend too! (I did not remove the boards from the amp to take photos of the other sides as I did not want to disturb the cleanly laid out wires without any reasons for removing it!)
This article was prepared for you by Parasuraman Subramanian from India. He is 74 years old and has more than 30 years’ experience in handling antique equipment like Valve Radio, Amps, Reel Tape Recorders and currently studying latest tech-classes conducted by Kerala State Electronics Technicians’ Association. He has done graduation in BBA degree, private diploma in Radio Engineering and retired as MD of a USA company. Presently working as Consultant to Hospital and other institutions.
Please give a support by clicking on the social buttons below. Your feedback on the post is welcome. Please leave it in the comments.
P.S-If you enjoyed reading this, to subscribe to my blog (free subscription). That way, you’ll never miss a post. You can also forward this website link to your friends and colleagues-thanks!
You may check on his previous article on
Likes (1)Dislikes
 (0)
(0)
//
(tiêu đề viết lên đầu)
This Lovely Locally Assembled Amplifier Had Only A Minor Problem
This amplifier was brought by a customer as per recommendation of another. The complaint was that the Sub-woofer was not working and one channel of the 5.1 Surround speaker systems was not working. I made preliminary enquiries about the speakers used and advised the customer to check each and every one of them using a single 1.5V cell, as all the speakers are fixed on the walls in his house. (Method: Touch the speaker wires to the cell and listen whether any sound is coming from the speaker. A crude method. But advised him not to keep it pressed but do only a touch and go!)
I opened the set and did a cleaning to the extent possible. Let us have a look at the lovely lay out and assembly which I am sure you all would agree that can match international standard. Whoever has assembled it and gave it to the customer has indefinitely done a praiseworthy creditable job indeed!
1) Power supply section (60V, 25V and 12V) 2) Subwoofer amplifier using transistors. 3) Speaker Protection circuit 4) Five output perhaps using TDA2030 series. 5) Audio level LED display driver 6) The preamp and tone control circuits 7) 5V supply for the USB/FM module fit in the front. 8) USB/FM Module.
I connected six speakers of various kinds. Then tried using my signal injector to check whether all the outputs were working. This did not work for all channels, as these were adjusted to split the frequencies to give a surround effect. So, played music from a USB and checked. Except for the subwoofer output, everything else was working. Then by chance I noticed that it was getting cut off only at full volume of the independent control it had. Since I had applied lubrication on all connectors and controls after the preliminary cleaning, dust or dirt could not be the problem. As there was a pair of connections in the dual pot, out of which only one set was used, I shifted the connections to the other side, upon which the output was normal. I checked the frequencies at the output using my oscilloscope and here are the findings of the six output stages:
While it is a fact that these might vary according to the music, one thing was confirmed that outputs indeed were coming out. I could not take such an output feeding a standard signal, as these get cut off due to filters employed in the circuit.
So, what looked like a major problem got resolved by a simple shifting of connections and perhaps because of the cleaning and lubrication. I played the Amp for several hours before closing the cover and calling the customer to pick it.
He later informed me that one of the wires of the speaker was found broken and he rejoined it. He had confirmed that he checked each and every speaker by connecting it to different channels and vehemently denied any problems in the speakers! But customers are strange and we need to deal with them as they are!
Mission accomplished with splendor and satisfaction got easy admission to the collection bag!
I am adding some more pictures of each board for those who might find it interesting:
P.S: Forgot to mention that Amplifier boards and power supply boards were manufactured by my close friend in my town and I was amused to see these used very well by an unknown technician situated far away from where the customer bought this. I shared the photos with my friend too! (I did not remove the boards from the amp to take photos of the other sides as I did not want to disturb the cleanly laid out wires without any reasons for removing it!)
This article was prepared for you by Parasuraman Subramanian from India. He is 74 years old and has more than 30 years’ experience in handling antique equipment like Valve Radio, Amps, Reel Tape Recorders and currently studying latest tech-classes conducted by Kerala State Electronics Technicians’ Association. He has done graduation in BBA degree, private diploma in Radio Engineering and retired as MD of a USA company. Presently working as Consultant to Hospital and other institutions.
Please give a support by clicking on the social buttons below. Your feedback on the post is welcome. Please leave it in the comments.
P.S-If you enjoyed reading this, to subscribe to my blog (free subscription). That way, you’ll never miss a post. You can also forward this website link to your friends and colleagues-thanks!
You may check on his previous article on
Likes(1)Dislikes(0)
//
[su_box title=”Liên hệ đặt mua sản phẩm tại bài viết tại Viễn Đông Mobile” style=”default” box_color=”#3be863″ title_color=”#FFFFFF” radius=”3″]
Viễn Đông Mobile là cửa hàng chuyên kinh doanh các sản phẩm điện tử phục vụ nhu cầu chơi game, bao gồm:
- Gaming phone: Điện thoại cấu hình mạnh, tối ưu cho việc chơi game.
- Máy tính bảng chuyên gaming: Màn hình lớn, hiệu năng cao, trải nghiệm game tốt hơn.
- Phụ kiện cao cấp: Tai nghe, bàn phím, chuột,… hỗ trợ game thủ.
Thông tin liên hệ:
- Địa chỉ: 211 đường 3/2, phường 11, quận 10, TP.HCM
- Điện thoại: 0777600020
- Email: contact@viendongmobile.com

Bản đồ chỉ đường
[su_gmap address=”211 đường 3/2 phường 11 quận 10 Tp hồ chí minh Việt Nam” responsive=”yes”] xin chào Xem chi tiết và đăng ký[featured_image]