## Màn Hình Bí Ẩn: Chữa Bệnh Cho LG W1953-TE PF
Ngày đăng: 2023-10-27
Một chiếc màn hình LG W1953-TE PF, sau khi được tôi sửa chữa bằng cách thay thế các tụ điện phồng hồi tháng 11 năm 2024, đã quay trở lại vào tháng 1 năm 2025 với lỗi “chết máy”. Trước đó, màn hình báo lỗi hiển thị mờ, tuy nhiên các tụ điện đã phồng lên, và tôi đã viết báo cáo về vấn đề này (đang chờ xử lý). Đó là một bí ẩn, và đây lại là một bí ẩn khác.
Sau khi mở máy và kiểm tra nguồn, điện áp 12V và 5V vẫn hoạt động bình thường. Nhưng khi bật công tắc, hoàn toàn không có phản hồi gì.
Tôi kiểm tra lại điện áp, tín hiệu P-on (Enable) cho đèn nền chỉ lóe lên rồi tắt. Tôi nghĩ vấn đề có thể nằm ở đèn nền, vì đây là màn hình LCD. Tôi tập trung vào vấn đề đèn nền và tải xuống bảng dữ liệu của nó.
Điện áp 12V có mặt ở chân 18. Tôi sử dụng máy kiểm tra vòng và kiểm tra cuộn thứ cấp của biến áp tăng áp và thấy nó hoạt động tốt. Sau đó, tôi sử dụng bo mạch của một màn hình LCD khác và kết nối đèn LCD, và đèn sáng lên, cho thấy đèn hoạt động tốt. Sau đó, tôi muốn bật đèn nền mà không cần kết nối bo mạch chủ. Tôi kết nối một điện trở 10K từ 12V đến chân enable 2. Tôi thử lại, nhưng đèn nền vẫn không sáng. Sau đó, tôi đã tham khảo một liên kết được chia sẻ bởi những người bạn kỹ thuật của tôi (liên kết bằng tiếng Hindi được cung cấp bên dưới).
Trong đó, người này nói rằng cần cắt mạch ở chân 9 và kết nối một điện trở 47K với mát. Nhưng điều đó cũng không làm cho đèn sáng, vì vậy tôi tháo IC Mosfet ra và kiểm tra. IC Mosfet có một kênh N và một kênh P:
Khi tôi kiểm tra Mosfet kép bằng đồng hồ vạn năng analog ở dải X1, cả hai Mosfet đều hoạt động tốt và bật/tắt bằng các phương pháp thông thường. Nếu ai muốn biết cách kiểm tra, có rất nhiều video trên YouTube. Vậy tại sao nó không bật?
Dù sao, tôi đã đặt hàng các IC thay thế, dự kiến sẽ nhận được trong vài ngày. Sau đó, tôi chuyển sự chú ý sang bo mạch chủ. Đầu tiên, tôi cắt nguồn 12V đến trình điều khiển LCD để vô hiệu hóa nó. Theo kinh nghiệm của tôi, thông thường màn hình nên hiển thị dấu hiệu nguồn đã bật. Đây là màn hình cảm ứng, tôi chạm vào màn hình nhiều lần, thậm chí dùng nhiều ngón tay và bàn tay khác nhau. Nhưng không có gì xảy ra. Sau đó, tôi kiểm tra số hiệu IC và tải xuống bảng dữ liệu của nó.
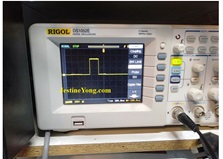
Sau đó, tôi sử dụng oscilloscope để kiểm tra tinh thể của IC vi điều khiển và thấy nó hoạt động tốt. Điện áp cũng bình thường:
Sau đó, kiểm tra xung clock và dữ liệu đến IC điều khiển cảm ứng. Tôi cũng tìm thấy chúng. Nhưng đầu ra từ IC vẫn giữ nguyên khi tôi chạm vào màn hình nhiều lần bằng các ngón tay và bàn tay khác nhau.
Tôi tháo các đầu nối và bôi dầu bôi trơn lên cả hai mặt; tức là bo mạch chủ và bo mạch phụ. Nhưng không có gì thay đổi. Sau đó, tôi thử chạm vào bo mạch từ phía sau thay vì phía trước. Và rồi, chiếc màn hình bí ẩn đó đã hoạt động trở lại!
Sau đó, tôi muốn kiểm tra đèn nền sau khi kết nối bo mạch chủ đang hoạt động. Vì vậy, tôi kết nối lại nguồn 12V, thay thế Mosfet và gỡ bỏ điện trở bảo vệ, khôi phục mọi thứ như trước đây. Và đèn nền lại sáng và màn hình hiển thị rất tốt!
Tôi để màn hình bật trong vài giờ trước khi lắp lại vỏ máy. Hãy cùng xem bo mạch chủ của chiếc màn hình bí ẩn này và kết quả:
Màn hình đã phản hồi khi chạm từ phía trước! Nhiệm vụ hoàn thành một cách bí ẩn, nhưng sự hài lòng là đủ lý do để ăn mừng! Các IC đã đặt hàng sẽ được bổ sung vào kho của tôi để sử dụng trong tương lai!
Bài viết này được thực hiện bởi Parasuraman Subramanian từ Ấn Độ. Ông 74 tuổi và có hơn 30 năm kinh nghiệm xử lý thiết bị cổ như Radio Valve, Ampli, Máy ghi âm băng cuộn và hiện đang theo học các lớp công nghệ mới nhất do Hiệp hội Kỹ thuật viên Điện tử Bang Kerala tổ chức. Ông tốt nghiệp Cử nhân Quản trị Kinh doanh (BBA), có bằng kỹ thuật Radio, và đã nghỉ hưu với tư cách là Giám đốc điều hành của một công ty Hoa Kỳ. Hiện ông đang làm tư vấn cho bệnh viện và các tổ chức khác.
Vui lòng ủng hộ bằng cách nhấp vào các nút mạng xã hội bên dưới. Phản hồi của bạn về bài viết này rất được hoan nghênh. Vui lòng để lại bình luận của bạn.
P.S- Nếu bạn thích bài viết này, hãy nhấp vào đây để đăng ký blog của tôi (miễn phí). Bằng cách đó, bạn sẽ không bỏ lỡ bất kỳ bài đăng nào. Bạn cũng có thể chuyển tiếp liên kết trang web này cho bạn bè và đồng nghiệp của mình – cảm ơn!
Bạn có thể xem bài viết trước đó của ông về Phẫu thuật Bypas trên Tivi SAMSUNG LED Model UA32T4450AKLXL
Thích (1) Không thích (0)
Hashtag: #SuaChuaManHinh #LGW1953TEPF #ManHinhLCD #BiAnKyThuat #SuaChuaDienTu #KyThuatSo #CongNghe #BaoDuongMay #CaiDatDienTu #LapRapDienTu #ChuyenGiaSuaChua #HuanLuYen #KyThuatVien #DienTuCoDien #KyThuatSo #Suachua #MangHinhBiAn #ManHinhCamUng #SuaChuaMayTinh
Ghi chú: Giá thành sửa chữa không được đề cập trong bài gốc, vì vậy không thể chuyển đổi sang VND. Nếu bạn có thông tin thêm về chi phí sửa chữa, vui lòng cung cấp để tôi có thể bổ sung vào bài viết.
Hãy viết bài báo dài đầy đủ chuyên nghiệp hay bằng tiếng VIệt kèm hashtag Mystery Monger Monitor – LG MODEL W1953-TE PF

This monitor which was serviced by me by replacing bulged capacitors in November, 2024 did a revisit in January, 2025 with the complaint that it was dead. Earlier the complaint was dull display though the capacitors were found bulged, about which I have already written a report and it is in the queue. That was one mystery and this is yet another.
On opening and checking the power supply, the 12V and 5V were present. But on switch on, absolutely nothing happened.
When I checked up the voltages, the P-on (Enable) for backlight was just coming as a flash and stopping. Then I thought the problem could be in the backlight, as this was an LCD monitor. I focused on the back light issue and downloaded its datasheet.
The 12V was present on pin 18. I used the ring tester and checked the secondary of the booster transformer and found it to be ok. Then I used another LCD Monitor full boards and connected the LCD lights and found the lights turning on indicating that the lamps were ok. Then I wanted to turn on the backlight without connecting the mother board. I connected a 10K resistor from 12V to enable pin 2. Then tried. But backlight did not light up. Then followed a link provided by my techie friends, which I am providing below. The language is Hindi.
In it, he said to cut the track of pin 9 and connect a 47K resistor to the ground. But that also did not turn the lamp on and I therefore removed the Mosfet IC and checked. The Mosfet IC was having one N-Channel and one P-Channel:
When I checked the duo Mosfet using my analogue multimeter in X1 range, both Mosfets were found to be working and it got on and off using the usual methods to turn it on. If anyone wants to know how to check it, there are plenty of videos in YouTube. Then why was it not getting on?
Anyhow I ordered for replacement ICs which I might get in a couple of days. Then turned my attention to the mother board. First I cut the 12V supply to the LCD driver to disable it. From my experience, usually the monitor panel should show indication of power on. This was a touch type panel and I touched the panel several times by even using different fingers and hands. But nothing woke up the monitor. Then I checked the IC number and downloaded its datasheet.
Then used my oscilloscope to check the crystal of the µcontroller IC and found it to be working. The voltages were also normal:
Then checked the clock and data pulses that go to the touch control IC. Found these also present. But the output from the IC was remaining stagnant when I tried touching the panel again and again using different fingers and hands.
I removed the connectors and applied lubrication oil on both sides; i.e, mother board and the slave board. But nothing changed the mutant monitor. Then I tried touching the board from behind instead of from the front. Then, the mysterious monger monitor woke up!
Then I wanted to check the backlight after connecting the working mother board. So, I re-connected the 12V supply, replaced the Mosfet and removed the de-protection resistor and made everything like how it was before. There again, the backlight was on and the display was also damn good!
I allowed the monitor to be on for several hours before putting the covers back. Let us have look at the mother board of this mystery monger monitor and the result:
The monitor was responding to the touch from the front also! Mission accomplished mysteriously though satisfaction had enough reasons to get entry to the bag! The ICs ordered will get added to my inventory for future use!
This article was prepared for you by Parasuraman Subramanian from India. He is 74 years old and has more than 30 years’ experience in handling antique equipment like Valve Radio, Amps, Reel Tape Recorders and currently studying latest tech-classes conducted by Kerala State Electronics Technicians’ Association. He has done graduation in BBA degree, private diploma in Radio Engineering and retired as MD of a USA company. Presently working as Consultant to Hospital and other institutions.
Please give a support by clicking on the social buttons below. Your feedback on the post is welcome. Please leave it in the comments.
P.S-If you enjoyed reading this, click here to subscribe to my blog (free subscription). That way, you’ll never miss a post. You can also forward this website link to your friends and colleagues-thanks!
You may check on his previous article on
Likes (1)Dislikes
 (0)
(0)
//
(tiêu đề viết lên đầu)
Mystery Monger Monitor – LG MODEL W1953-TE PF
This monitor which was serviced by me by replacing bulged capacitors in November, 2024 did a revisit in January, 2025 with the complaint that it was dead. Earlier the complaint was dull display though the capacitors were found bulged, about which I have already written a report and it is in the queue. That was one mystery and this is yet another.
On opening and checking the power supply, the 12V and 5V were present. But on switch on, absolutely nothing happened.
When I checked up the voltages, the P-on (Enable) for backlight was just coming as a flash and stopping. Then I thought the problem could be in the backlight, as this was an LCD monitor. I focused on the back light issue and downloaded its datasheet.
The 12V was present on pin 18. I used the ring tester and checked the secondary of the booster transformer and found it to be ok. Then I used another LCD Monitor full boards and connected the LCD lights and found the lights turning on indicating that the lamps were ok. Then I wanted to turn on the backlight without connecting the mother board. I connected a 10K resistor from 12V to enable pin 2. Then tried. But backlight did not light up. Then followed a link provided by my techie friends, which I am providing below. The language is Hindi.
In it, he said to cut the track of pin 9 and connect a 47K resistor to the ground. But that also did not turn the lamp on and I therefore removed the Mosfet IC and checked. The Mosfet IC was having one N-Channel and one P-Channel:
When I checked the duo Mosfet using my analogue multimeter in X1 range, both Mosfets were found to be working and it got on and off using the usual methods to turn it on. If anyone wants to know how to check it, there are plenty of videos in YouTube. Then why was it not getting on?
Anyhow I ordered for replacement ICs which I might get in a couple of days. Then turned my attention to the mother board. First I cut the 12V supply to the LCD driver to disable it. From my experience, usually the monitor panel should show indication of power on. This was a touch type panel and I touched the panel several times by even using different fingers and hands. But nothing woke up the monitor. Then I checked the IC number and downloaded its datasheet.
Then used my oscilloscope to check the crystal of the µcontroller IC and found it to be working. The voltages were also normal:
Then checked the clock and data pulses that go to the touch control IC. Found these also present. But the output from the IC was remaining stagnant when I tried touching the panel again and again using different fingers and hands.
I removed the connectors and applied lubrication oil on both sides; i.e, mother board and the slave board. But nothing changed the mutant monitor. Then I tried touching the board from behind instead of from the front. Then, the mysterious monger monitor woke up!
Then I wanted to check the backlight after connecting the working mother board. So, I re-connected the 12V supply, replaced the Mosfet and removed the de-protection resistor and made everything like how it was before. There again, the backlight was on and the display was also damn good!
I allowed the monitor to be on for several hours before putting the covers back. Let us have look at the mother board of this mystery monger monitor and the result:
The monitor was responding to the touch from the front also! Mission accomplished mysteriously though satisfaction had enough reasons to get entry to the bag! The ICs ordered will get added to my inventory for future use!
This article was prepared for you by Parasuraman Subramanian from India. He is 74 years old and has more than 30 years’ experience in handling antique equipment like Valve Radio, Amps, Reel Tape Recorders and currently studying latest tech-classes conducted by Kerala State Electronics Technicians’ Association. He has done graduation in BBA degree, private diploma in Radio Engineering and retired as MD of a USA company. Presently working as Consultant to Hospital and other institutions.
Please give a support by clicking on the social buttons below. Your feedback on the post is welcome. Please leave it in the comments.
P.S-If you enjoyed reading this, click here to subscribe to my blog (free subscription). That way, you’ll never miss a post. You can also forward this website link to your friends and colleagues-thanks!
You may check on his previous article on
Likes(1)Dislikes(0)
//
[su_box title=”Liên hệ đặt mua sản phẩm tại bài viết tại Viễn Đông Mobile” style=”default” box_color=”#3be863″ title_color=”#FFFFFF” radius=”3″]
Viễn Đông Mobile là cửa hàng chuyên kinh doanh các sản phẩm điện tử phục vụ nhu cầu chơi game, bao gồm:
- Gaming phone: Điện thoại cấu hình mạnh, tối ưu cho việc chơi game.
- Máy tính bảng chuyên gaming: Màn hình lớn, hiệu năng cao, trải nghiệm game tốt hơn.
- Phụ kiện cao cấp: Tai nghe, bàn phím, chuột,… hỗ trợ game thủ.
Thông tin liên hệ:
- Địa chỉ: 211 đường 3/2, phường 11, quận 10, TP.HCM
- Điện thoại: 0777600020
- Email: contact@viendongmobile.com

Bản đồ chỉ đường
[su_gmap address=”211 đường 3/2 phường 11 quận 10 Tp hồ chí minh Việt Nam” responsive=”yes”] xin chào Xem chi tiết và đăng ký[featured_image]